Configuration
Create an Alerting Profile
-
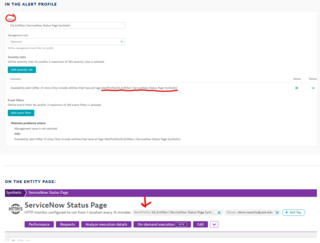
Go to Settings > Alerting > Problem alerting profiles
- Select Add alerting profile
- Enter a name for the new profile
- Note: This will be the same name as the problem notification
- If the notification will be using ServiceNow, add “| ServiceNow” to the end of the name
- e.g. - FTS_Linux | ServiceNow
- (Optional) Define the management zone filter
- This causes the alerting profile to only evaluate data coming from the specified management zone
- The default is set to All, but a filter should be applied in most cases, which reduces the profile scope to the scope of your teams’ responsibility
- Management zones can overlap (multiple filters will be applied if a problem is detected on a service that is defined within multiple management zones)
- *** If you are using tags for criteria, skip this and apply those in the next step***
- Define the severity-level rules
- You can specify up to 20 severity rules
- Rules are combined by the OR logic, so an event fulfilling any of the rules triggers a notification
- The following criteria can be used when applying filters:
- The severity level (type of problem)
- How long the problem is open before an alert is sent out
- (optional) Monitoring entities that have any/all of the specified tags are combined by the AND logic, so all of them must be fulfilled for the rule to be invoked
- Define the event filter (if needed)
- This can be based on specific built-in event types (Predefined) or on a title/description of an event (Custom)
- You can specify up to 20 event rules
- The following criteria can be used when applying filters:
- (Predefined events) Event type
- (Custom Events) Title and description of the event
- Criteria can be inverted using the negate option (this turns begins with into does not begin with)
- Rules are combined by the following logic:
- Rules that contain negated criteria are grouped by the AND logic
- All other rules are grouped by the OR logic
- The two groups (negated and non-negated) are grouped by the AND logic
- Review the summary of criteria for the new alerting profile
- Select Save Changes